After consideration and study - the turtles were in a bad place. Foot traffic, possibly car traffic - dogs off leash, egg predators - and a massive colony of ants.
Excavating the eggs is a careful process. You can't just go with a shovel or small garden spade. Nope. The eggs are fragile, easily perforated. They are also required to stay in the same position, as the fetus is attached to the egg's skin. Detatchment.. well, is bad. The turtle will most likely die if you do that. So - here is what I did. First, I excavated a thin layer of soil - as well as weeds and grass that had grown over the site. The picture directly below shows the site after I did this. The white isn't an egg (bottom of pic) it's the plastic spoon I was using. It wasn't sharp so there would be less danger involved.

Next, I dug carefully with the spoon, wiping away with a large paintbrush - bristles about 2x2 inches and 0.5 inches thickness. Slow and steady, turtle style! I admit, I was getting discouraged, I felt the eggs were close but I wasn't finding any! I was finding LOTS of ants and dead roots, however - which tipped me off. The dead roots had been uprooted by the mother, so I dug more in the dead root area. After forty minutes of diggin - I gasped. I could see three little eggs...
I marked each one by one - with a nontoxic marker. An X on each egg. I carefully excavated the area around each egg with the paintbrush and my fingers. (Make sure you wash your hands before and after this procedure - should you need to do it.) Remember, the eggs absorb things - (air, water, etc) you don't want to use poisonous substances in this process. Below, you can see one of the eggs, marked with an X - and a few roots around it. The roots were hard to get through, but of course worth every minute of it. I carefully removed each egg. Keeping it X side up, gently scooping it up with the spoon and my fingers. I had made little nest-like holes in some potting soil I poured into a plastic container. Each egg was nestled in its own little nook. You'll get to see this in the next post I write about the eggs in my home.
I carefully removed each egg. Keeping it X side up, gently scooping it up with the spoon and my fingers. I had made little nest-like holes in some potting soil I poured into a plastic container. Each egg was nestled in its own little nook. You'll get to see this in the next post I write about the eggs in my home.
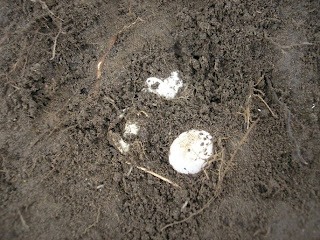
In one of the photographs - you can actually see an ant egg. You see the photo above this text? It's in the top left quadrant near the edge. There were dozens of them around the broken egg. Out of 9 eggs, only one was broken and being feasted on by the large colony of ants. It was humbling to see the ants heaving the eggs to safety as I used a paint brush and plastic spoon to excavate the nest. They rushed them to a nearby hole, disappearing one by one in beautiful order. I left the broken egg to the ants after making sure there wasn't a turtle in it. A bit of fact-finding. Are these eggs fertilized? We'll see.
Part three coming soon!
No comments:
Post a Comment